Apple is planning to release Mac OS X version 10.6 Snow Leopard on August 28 according to the main page of Apple.
Check out a review at Gizmodo
Check out Lifehacker for some info on pricing by clicking here
It is however available now for order at a discount from Amazon.
ENJOY!
NCT

Thursday, August 27, 2009
Wednesday, August 26, 2009
How to add TIff Imagery to ESRIs ArcPAD 7.x
ESRI's ArcPad 7.x is a great program for your Windows Mobile based GPS unit. I use it on various Trimble handhelds for accurate submeter gps collection. But what if you want to have your aerial imagery or topo quads displayed on the unit as well? Storage is the limiting factor so how is it done? Read on for one of the ways I add imagery to a handheld.
The original article that spawned this tutorial can be found at The ArcPad Team Blog. After running through their tutorial and finding that the images created at the scale I needed where too big, I went a slightly different direction to get the images I needed.
In this situation we wanted to create ½ quad images and still have file size be small enough to run on our Trimble Geo and Trimble Juno handheld GPS units.
Required software:
ArcGIS Desktop – http://www.esri.com - single use will suffice
Irfan View - http://www.irfanview.com – free
ArcPad 7.x - http://www.esri.com - running on PC or GPS unit
You also need to have adequate storage space on your handheld unit, so create a couple test images to make sure you will have the required space, and that quality and performance is acceptable on your unit.
Step 1: Install IrfanView
1. Go to http://www.irfanview.com and download the free software
2. Install IrfanView to you desktop.
Step 2: Check settings in Windows Explorer to Display Known File Types
Step 3: Create BMP image files in ArcMap.
1. Open a blank map in ArcMap and add your imagery. This can either be a sid mosaic, or an ecw file etc.
2. Zoom to the appropriate scale of you image. For ½ quads we added the quad boundaries and zoomed to a scale of 1:40,000 then turned off the boundaries. It may take some testing to find the correct scale, and number of images to create. If you are creating imagery for a larger county (Los Angeles) ½ quads at 1:40,000 would not be an appropriate solution.
3. Once you have your view set click on File -> Export Map.
4. Choose a name and location for your image file
5. Save as file type BMP (*.bmp)
6. Choose your Resolution. Keep in mind the larger the dpi the larger the file will be.
7. Choose Write World File – This is what gives the image it’s place in the world.
8. Click save.
Step 4: Convert BMP to TIF File Using IrfanView
1. Open your BMP file in IrfanView and choose ‘save as’. Make sure you choose LZW compression. Choose a location and make sure you save it as a TIF file.
Step 5: Convert BMP World file to TIFF world file.
1. *.BPW are BMP world files. Make a copy of the ones you want to convert to a temp folder.
2. Right Click on the bpw and choose rename or click F2 to rename the file.
3. Delete the bpw extension and change it to tfw. Hit enter or click anywhere in the folder to stop the rename.
4. That is all you need to do to export imagery out to a hand held device. Upload your new image file open in ArcPAD and test out the performance. This way of exporting does not have a projection file (prj) and quality of the image will be less than that of exporting directly from a shapefile. The trade off in this case is lower quality for higher performance.
Question or comments just ask!
NCT
Mac OS X Keyboard Shortcuts
There are a lot of Mac OS X shortcuts available but how many of them do you know? If you have some spare time head on over to Apple's Support page for all the shortcuts you can handle.
[ links ]
Apple Support
[ links ]
Apple Support
How to backup your Computer Licenses with LicenseCrawler
Backup the license files on your computer before reinstalling Windows with License Crawler. Easy way to scan your registry for your license codes when needing to reinstall your PC software.
I would guess that most of us have been in this situation before; You need to reinstall software on your Windows XP computer but you cannot seem to find the CD or the serial number for your program. What are you to do? Go purchase another copy of the software just to get the serial code? Don't do that my friends, just use LicenseCrawler to scan your registry and recover your serial numbers.
This simple, FREE, Windows XP program can be downloaded and then run directly from your computer, and all it does is scan your registry for your licenses. Of course you can always open your registry editor and try to find the info yourself, but who has the time to do that? After the scan is complete, highlight all the found licenses, copy the data to you notepad and print out your licenses. This way you never have to worry about losing your licenses. Nowadays a lot of programs can be downloaded and installed from the internet and all you really need is your previous license.
This is a pretty cool program that can be quickly and easily used when you are in a pinch and need your license.
Questions? Comments? Just ask!
Blue Screen of Death Errors Explained BSOD
BSOD Blue Screen of Death Errors explained by Maximum PC. Windows XP Blue Screen of Death Errors explained.
After you have figured out what your BSOD error actually is you can check out this post over at Maximum PC for a crash course in BSOD errors. Post any question or comments below - we are here to help.
After you have figured out what your BSOD error actually is you can check out this post over at Maximum PC for a crash course in BSOD errors. Post any question or comments below - we are here to help.
Tuesday, August 25, 2009
Troubleshoot Blue Screen of Death with BlueScreenView
The Blue Screen of Death can be quite an upset to see when trying to get work done. How in the world can you even write down the info before the screen is gone? Never fear the solution is here. Download a utility called BlueScreenView and view the exact error and research the solution.
We all know how it is feels to see the Blue Screen of Death (BSOD). Most of us think time for a format and reinstall right? Well, not necessarily - Check out this easy to use utility from Nir Sofer. You run the program straight from the *.exe and it will search your minidump files and allow you to view the error. Then, just research the solution, call your IT/computer guy (hint hint... ME) and you may be one step closer to the solution.
Check out the program here
Monday, August 17, 2009
A call for help and ideas...
Welcome... I hope you are all enjoying the blog so far. We have been up and running a little over two weeks and have received some great visitor numbers. BUT we need your help. This site is meant to help as many people with common computer problems from people you have grown to trust and confide in when having computer questions.
In an attempt to provide you, the user, with the best possible content and to increase the overall usefulness of the site we need your ideas. What would you like us to write about? Do you want more iPhone content, more software/product reviews or more Mac tips? We want to provide people with useful content so you will become accustomed to finding the answers you need on this site. If you have any suggestions, comments or ideas please please please email us:
ninjacompteam@gmail.com
you can also get a hold of us on google talk and yahoo - both can be reached at NinjaCompTeam
We are also working on fixing the comments sections as well as having a contact form to make it easier to get a hold of us. This is part of the initial plan for NinjaTechHelp v2.0 but we want incorporate user comments and suggestions as well. We are also looking for article writers and more ways to expand the site.
We look forward to your comments and suggestions!
Control a Windows Mobile Device on your PC MyMobiler
Often I am asked how to connect and view a Windows Mobile based device on your PC. I have discovered an easy to install solution called MyMobileR. This easy to use program allows you to view your Windows Mobile Phone on your PC and even control the phone from your PC.
When I was running my Samsung i760 Windows Mobile 6.0 cell phone one of the things that bothered me was texting and using the phone when it was connected via ActiveSync. The flip up keyboard and plug always seemed to be inconvenient. I started searching through Google and finally ran across a program that seemed to perform as desired. Really all you need to do is cruise your favorite web browser (I recommend Firefox ) to the MyMobileR Website and download the program. Most users will just want to download the PC installer. From there you just install the program, connect yout Windows Mobile Device and you are good to go.
From there it just gets better. You can actually use your keyboard and mouse to control the phone. You can do things like text message and email through your PC; for me that was the greatest thing for that phone.
If you have a WIndows based mobile device I recommend checking this out. Just so you know, I am in no way affiliated with MyMobileR nor am i receiveing any compensation for recommending this program. As I find solutions to computing problems I will update it here.
Peace.
Wednesday, August 12, 2009
How to Run Windows XP Defragmenter
 Over time every hard drive in your PC can and will become fragmented. As the fragmentation gets worse the overall speed and performance will progressively get worse. The Windows XP Defragmenter utility will reorganize your hard disk and place the empty unused space at the end of the drive. This will help increase access and read speeds of your hard disk drives.
Disk Defragmenter can be accessed by navigating to My Computer then right clicking on your hard drive and choosing properties. From there go to the second tab labeled Tools.

In the middle of the box there will be the Defragment Now button. Go ahead and left click that to open the Disk Defragmenter.
This will open the Defragmenter utility. From here there are a couple things you should know.
1. You should have at least 15% free space on each hard drive you plan to defragment. You can defragment with less but it is not recommended.
2. Once you start the defragment process it could take several hours to defragment each hard drive. I usually start the process and let it run over night, and overall computer performance will be poor, and working while running the defragmenter kind of defeats the purpose.
If you are unsure if you need to defragment a drive click the analyze button and run the test to determine the amount of disk fragmentation. From there you can either close the program or click the Deframent button based on the test results.
That pretty much sums up the Defragmenter utility. If you have questions/comments/additions please contact us.
NinjaCompTeam
Saturday, August 8, 2009
How to Set up a Cisco Linksys Wireless Router
 The Cisco Linksys WRT54G Wireless Router has become very popular recently for their ability to upgrade the firmware with DD-WRT. But what if you want to use the firmware provided by Linksys out of the box? Well then read on for some of the more popular options provided with the router.
** Note: Your router may have slightly different software. This article assumes you have the router connected and powered on and can access the internet. It will be much easier to configure the router if you are connected with an ethernet cable. Configuring the router with the wireless connection can be difficult and very frustrating.
1. Begin by opening your web browser to URL 192.168.1.1 or URL 192.168.15.1 - In most cases I recommend using the web interface instead of the wizard and the quick start button.
2. A login box will pop up asking for a user name and password. By default there is no username and the password is Admin. See the photo below.

The web interface may appear to be very intimidating and overwhelming, but take it one step at a time and it can be very easy. The bulk of the options you will most likely never use. If all else fails your router should work in the default configurations in order to get you connected to the internet.
3. Once logged in you should see navigation tabs along the top. Start with the default screen.

Look for the box part way down the screen labeled 'Number of Addresses' - the default is 50 - I recommend changing it to a couple more than the amount of computers you plan to have connected to your network. It is not critical but I like knowing only a small amount of people can login to the network.
4. Next click the 'Wireless' tab. Under 'Basic Wireless Settings' change the SSID to something unique so you can remember it. The SSID is the name that appears when you connect to your wireless internet. You also have the option of Disabling the broadcast of the SSID so it does not show up in the network list. This can be very handy for security but can make it more difficult to connect to. I do recommend hiding the SSID once everything is setup and working.
Once you choose the settings click 'Save Settings'

5. Click on the 'Wireless Security' sub tab next. Choose 'WPA Pre-Shared Key' and choose a key. Make this key to be something you can remember but something people will be unable to guess. The longer you make the Key the harder to crack it will be become. This Key is essentially your password to access your network.
Click the Save Settings button at the bottom.
6. It is also a good idea to change the router access password. Click on the 'Administration' tab and make sure the 'management' sub tab is chose. From here you create whatever password you want. This is the password you enter to access this web configuration utility.
Click 'Save Settings'.
At this point you should be able to test out your wireless configuration on your router. Open your program of choice to connect to your now secure wireless network.
As always this is for informational purposes only with warranty expressed or implied. Use this tutorial at your own risk and when in doubt ask questions.
More information can be obtained about the WRT54G by visiting the Linksys website or by visiting SeattleWireless.net
Check back for more Networking articles.
NinjaCompTeam
Friday, August 7, 2009
5 Tips to Speed up Your Windows XP Computer
Does your computer seem to be going slower and slower? Are programs slower to load? Do you have random pop up ads that seem to appear from out of nowhere? If so keep reading for some helpful tips on how to restore the performance of your Windows XP System. Have a tip that wasn't listed here? Post them in the comments sections below.
1. One way to speed up your PC performance is to use the disk cleanup function. You can find this by double clicking on 'My Computer'. Then right click on your C:\ Hard drive and choose Properties. If you have done it correctly it will look like the image below:
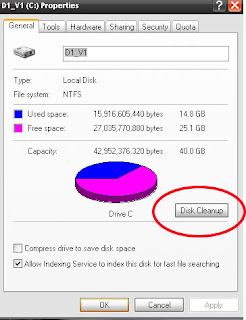
Click on 'Disk Cleanup'. It will then calculate how much free space you can free up. Check the boxes to choose what items you want to clean up, making sure not to delete files you may want to keep.It will also compress old files in order to help maximize disk space.
2. Once you have completed that task you can run the Disk Defragmenter. This tool will reorganize the physical location of files on your hard drive and move as much free space together on the drive. ** NOTE: Your folder structure will not be moved or changed during this process.
You can access the disk defragmenter by clicking Start -> All Programs -> Accessories -> System Tools -> Disk Defragmenter. A future article will go into more detail on how to use the Disk Defragmenter tool.
3. In order to eliminate your popup ads you will want to download a program such as Lavasoft Ad-aware. This version is the free one, but they also an excellent paid version that is more than worth the money. Download and install this program. Run Ad-Aware and choose a 'Full System' Scan. Make sure to download the current spyware definitions through the program.
4. Antivirus - Anti Virus is an essential in today's computing world. There are many paid and free antivirus options. The free antivirus I recommend is AVG Antivirus Free. As with Ad-aware there are also excellent paid options as well.
I recommend staying away from all encompassing programs such as Norton and McAfee as they tend to slow down performance and can be a pain to setup and configure. But spending some time with those programs can also yield the desired results.
5. remove unwanted programs. Unwanted programs can take up hard drive space and also cause undesired computer operation. Use the Add/Remove Programs utility from the control panel to remove unwanted programs. In some cases a program will install
unwanted programs you are unaware of. When installing programs look out for check boxes in order to avoid installing unwanted programs.
Hopefully these 5 tips help to improve performance on you Windows XP computer. If you have questions or need help ask in the comments.
if you ave additional tips please post them in the comments. Remember this is advice only. We are not held liable, nor is there any warranty expressed or implied by following the instructions in this blog. Follow directions at your own risk.
NinjaCompTeam
Thursday, August 6, 2009
All About PC Hardware from - Maximum PC
Maximum PC has a great article about 22 PC parts Exposed. This is a pretty interesting article and I recommend checking it out.
22 PC Parts Exposed
22 PC Parts Exposed
How to Print Screen / Screen Capture on a Mac
Have you ever wanted to create a screen capture or print screen in your Mac OS X but found there is no Print Screen key? Well read on to find the easy solution.
If you want to do a whole screen capture:
[] Switch to the screen you want to capture
[] Simultaneously hold down the Apple key ⌘ + Shift + 3 and then release
[] Click on the screen.
[] This should place your screen capture on your desktop.
If you want to capture only a portion of the screen:
[] Switch to the screen you want to capture
[] Simultaneously hold down the Apple key ⌘ + Shift + 4 and then release
[] The mouse pointer will turn into a target
[] Drag a box around the area to capture
[] Release the pointer and a file will be added to your desktop
If you want to create a screen capture for an application window:
[] Switch to the screen you want to capture
[] Simultaneously hold down the Apple key ⌘ + Shift + 4 and then release
[] The mouse pointer will turn into a target
[] Press the space bar once
[] The mouse pointer will change to a camera
[] You can then select the program you want to capture and click once
[] The capture will be placed on the desktop
You can then open the file in your favorite image editor for use on your blog etc.
Good luck and Happy Capturing.
Wednesday, August 5, 2009
Mac OS X 10.5.8 Final update released

Earlier today Apple released the Mac OS X 10.5.8 minor point release. This should be the final minor point release before launching Snow Leopard in September of 2009.
For more info on this release check out the link below.
Mac OS X 10.5.8 Release
How to Upgrade Windows XP to Windows 7
I don't normally want to have external how-to posts on this blog but I feel upgrading Windows XP to Windows 7 is going to be a big deal if it is not already.
The folks over at LifeRocks 2.0 have done an excellent job putting this together so I figured it was worth while.
Click the link below to see this excellent writeup.
Upgrade Windows XP to WIndows 7
The folks over at LifeRocks 2.0 have done an excellent job putting this together so I figured it was worth while.
Click the link below to see this excellent writeup.
Upgrade Windows XP to WIndows 7
Tuesday, August 4, 2009
Upgrading a PC – Part I
Welcome to part I of a multipart series on how to upgrade a PC. Some of you may have an older PC that just doesn’t cut it in the way of performance, graphics or storage space. There are several hardware aspects that can be easily upgraded even by a total beginner that can transform ad older computer into a respectable computer machine.
In part I will discuss the different types or hardware. Part II will discuss the different plugs and connectors, how to recognize them and how to research your system. Part III will discuss how to physically upgrade the components.
PCs can be versatile in the way of upgrading. Typically consumers upgrade hard disk drives (HDD), video cards, and RAM. The processor and power supply can also be upgraded as well as many the mechanism for cooling your PC.
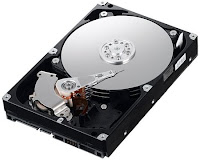
HARD DISK DRIVES
Let us begin with the hard disk drive (from here on HDD). Consumer hard drives typically come in two flavors; Internal and External. Internal HDD can either use an IDE or SATA connector port (see part II for more info). External HDDs are typically USB or FireWire although eSATA connectors are also available. For the scope of this article I will focus on internal HDDs since external drives are pretty much plug and play.
All hard drives have cache and speed ratings. If you are adding a HDD for storage a speed of 7200 rpm and 16 or 32 Mb of cache is pretty typical. Personally I like Western Digital or Seagate HDDs although Maxtor and Fujitsu also manufacture HDDs. The price of storage has dropped dramatically with the typical price being less than $1.00 per Gigabyte. If you are needing to add storage space for media such as video, music or photos I recommend either purchasing a 1 terabyte HDD (roughly 1000 Gigabytes) or a 720 Gigabyte HDD. That may sound excessive but storage space goes fast and you want some extra room to grow into the drive.
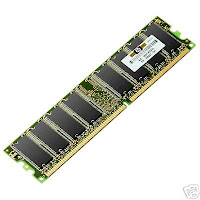
RAM
RAM is another aspect of the computer that can be easily upgraded. People often refer to this piece of hardware as the memory of a computer. Windows XP ® for example recommends 512Kb or RAM when running the OS, but the more RAM you are able to add to a system the better off you will be. Think of RAM as workers at a factory. If you have 512 workers and the tasks you wanting to perform require 1024 workers, those 512 have to do perform multiple jobs. The same thing happens with your computer. The more programs you open the more RAM you need to run those programs. Most RAM can be purchased today in 512 Mb, 1024 Mb (1 gig), 2 gig and 4 gig. If you are running Windows XP ® your system can only handle 4 gigs or RAM. Windows Vista and Windows 7 can handle more RAM than that. There are many different speeds of RAM as well as different types. More on that in Part II.
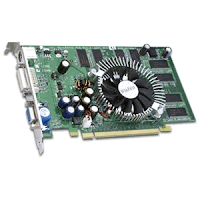
VIDEO CARD
The video card is the hardware that controls the visualization and graphics of your computer. Video cards can either be onboard, meaning they are built into the motherboard or they can use slots in the motherboard to connect to the system. Typical connectors are AGP, and PCI express. AGP and PCI express have different slots, and different speeds and will be discussed in part II. Video cards these days are like mini computers within your computer. There are two main companies that offer their chipsets (Nvidia and ATI) to manufactures (PNY, XFX etc) and they design the rest of the video card for use in your system. Video cards can be fairly complicated but the general theory is the faster the processor and more RAM will have better performance than the lesser processor and RAM. Be sure to compare prices on video cards and some are reasonably priced and some are more expensive without a great performance gain.
PROCESSOR
The processor is the portion of your PC that actually crunches data and does the work of the computer. There are single core, dual core, and quad core processors. A dual core processor has (2) single core processor in one chip and a quad core processors has (4) single core processors in one chip. Most PCs these days are available with a dual core processor (Intel or AMD) or quad core processor. This allows the PC in theory to process twice as many processes as the single core processor. Motherboards have processor sockets that the processor connects to. There are many types of sockets (LGA 775, Socket 7 etc) and you need to match your motherboard and processor so they will be compatible.
POWER SUPPLY
The power supply is the unit that converts power from the wall socket to power your PC can use. Power supplies have a wattage rating and you need to match the wattage of the power supply to what you will be running in your PC. A good rule to follow is once you are out of power plugs it might be time to consider upgrading power supply. You can also add up the total wattage specs of each component to make sure you are not overloading the power supply. If you are upgrading existing equipment you should be ok with the power supply you currently have.
Part II will explain in more detail each component and how it connects to the motherboard in your PC. Hopefully photos will be available at that point as well.
Please note this article is merely based to be informative. If you find errors or inaccuracies please send us an email and we will correct it. Any advice in this article, or this blog are to be used at your own risk, and we take no responsibility for harm or damages caused by this article or blog.
LINKS:
Western Digital
Intel
Nvidia Graphics
Peace,
Ninja Computer Team
In part I will discuss the different types or hardware. Part II will discuss the different plugs and connectors, how to recognize them and how to research your system. Part III will discuss how to physically upgrade the components.
PCs can be versatile in the way of upgrading. Typically consumers upgrade hard disk drives (HDD), video cards, and RAM. The processor and power supply can also be upgraded as well as many the mechanism for cooling your PC.

Let us begin with the hard disk drive (from here on HDD). Consumer hard drives typically come in two flavors; Internal and External. Internal HDD can either use an IDE or SATA connector port (see part II for more info). External HDDs are typically USB or FireWire although eSATA connectors are also available. For the scope of this article I will focus on internal HDDs since external drives are pretty much plug and play.
All hard drives have cache and speed ratings. If you are adding a HDD for storage a speed of 7200 rpm and 16 or 32 Mb of cache is pretty typical. Personally I like Western Digital or Seagate HDDs although Maxtor and Fujitsu also manufacture HDDs. The price of storage has dropped dramatically with the typical price being less than $1.00 per Gigabyte. If you are needing to add storage space for media such as video, music or photos I recommend either purchasing a 1 terabyte HDD (roughly 1000 Gigabytes) or a 720 Gigabyte HDD. That may sound excessive but storage space goes fast and you want some extra room to grow into the drive.

RAM
RAM is another aspect of the computer that can be easily upgraded. People often refer to this piece of hardware as the memory of a computer. Windows XP ® for example recommends 512Kb or RAM when running the OS, but the more RAM you are able to add to a system the better off you will be. Think of RAM as workers at a factory. If you have 512 workers and the tasks you wanting to perform require 1024 workers, those 512 have to do perform multiple jobs. The same thing happens with your computer. The more programs you open the more RAM you need to run those programs. Most RAM can be purchased today in 512 Mb, 1024 Mb (1 gig), 2 gig and 4 gig. If you are running Windows XP ® your system can only handle 4 gigs or RAM. Windows Vista and Windows 7 can handle more RAM than that. There are many different speeds of RAM as well as different types. More on that in Part II.

VIDEO CARD
The video card is the hardware that controls the visualization and graphics of your computer. Video cards can either be onboard, meaning they are built into the motherboard or they can use slots in the motherboard to connect to the system. Typical connectors are AGP, and PCI express. AGP and PCI express have different slots, and different speeds and will be discussed in part II. Video cards these days are like mini computers within your computer. There are two main companies that offer their chipsets (Nvidia and ATI) to manufactures (PNY, XFX etc) and they design the rest of the video card for use in your system. Video cards can be fairly complicated but the general theory is the faster the processor and more RAM will have better performance than the lesser processor and RAM. Be sure to compare prices on video cards and some are reasonably priced and some are more expensive without a great performance gain.
PROCESSOR
The processor is the portion of your PC that actually crunches data and does the work of the computer. There are single core, dual core, and quad core processors. A dual core processor has (2) single core processor in one chip and a quad core processors has (4) single core processors in one chip. Most PCs these days are available with a dual core processor (Intel or AMD) or quad core processor. This allows the PC in theory to process twice as many processes as the single core processor. Motherboards have processor sockets that the processor connects to. There are many types of sockets (LGA 775, Socket 7 etc) and you need to match your motherboard and processor so they will be compatible.
POWER SUPPLY
The power supply is the unit that converts power from the wall socket to power your PC can use. Power supplies have a wattage rating and you need to match the wattage of the power supply to what you will be running in your PC. A good rule to follow is once you are out of power plugs it might be time to consider upgrading power supply. You can also add up the total wattage specs of each component to make sure you are not overloading the power supply. If you are upgrading existing equipment you should be ok with the power supply you currently have.
Part II will explain in more detail each component and how it connects to the motherboard in your PC. Hopefully photos will be available at that point as well.
Please note this article is merely based to be informative. If you find errors or inaccuracies please send us an email and we will correct it. Any advice in this article, or this blog are to be used at your own risk, and we take no responsibility for harm or damages caused by this article or blog.
LINKS:
Western Digital
Intel
Nvidia Graphics
Peace,
Ninja Computer Team
Monday, August 3, 2009
Useful iPhone Apps
With Apple approving applications for the iTunes store at an alarming rate who can possibly have the time to sort through all the worthless apps to find the good ones? Well over the past year I have been searching and testing various apps, and the following list is what I have found to be some of my favorite iPhone / iTouch apps.

THINGS – This app allows you to organize your life into List such as Inbox, Today, Next, Scheduled and projects. You can also organize your items based on tags and include due dates and notes on the Things you need to get done. I recommend this if you desperately need to organize your to-do list.
MPG – This app does exactly what you are thinking and more. Not only can you track your Miles Per Gallon, but you can track how much you paid per gallon, the station you purchased gas, and even the maintenance on multiple vehicles. Want to track MPG on a road trip? MPG has that too. To top it all of you can receive maintenance reminders and even export the data with MobileMe or send it to an email address.
REMOTE – Released by Apple itself; this app allows you to connect and control your computers iTunes Library acting as a remote control. Remote connects through your WiFi connection with a 4 digit pass code and can be easily setup to control any number of iTunes Libraries. In my opinion this is a must have application for anyone who runs iTunes through a TV or stereo system.

MMS BUDDY - With all the talk about Apple releasing MMS capability sometime this summer, what is the best solution until the much anticipated release? I recommend MMS Buddy. Although you can only receive MMS messages with this program, it operates much faster and cleaner than other MMS programs. Overall performance is also improved over its competitors and provides the option to save the photos or send them to the trash. The developer also provides a pretty decent tutorial on how to operate the program.
HUNDRED PUSHUPS – Do you need to increase your upper body strength? If so check out Hundred Pushups. This application provides a 6 week training program with the goal of completing one hundred pushups. The routine gradually gains difficulty and is a great way to work out your upper body.
What are your favorite iPhone iTouch apps? Post answers in the comments section.
** Note: We are in no way affiliated with Apple, the iTunes Store or any of the applications mentioned here, nor are we being paid to comment on any of these applications. **
Ninja Computer Team
Sunday, August 2, 2009
Ninja Tech Help is up and running!
Welcome to Ninja Tech Help. This site is meant to help consumers, family and friends determine the best products to purchase within the computer, cell phone, and electronics industry.
There will also be tutorials and "how-to" articles designed to teach users various aspects of computing, networking, and overall Mac and PC uses.
Products will vary from iPhones, iPod Touch, GPS units, hard drives, wireless networking, PC and Mac install how-to as well as reviews for all these products and anything else we decide to review.
This site is in teh very first stages of infancy, as such suggestions and comments are more than welcomed.
Thanks!
The Ninja Computing Team
Subscribe to:
Comments (Atom)